Other Morchok guides on Tauri Veins:
 This guide is intended to provide a comprehensive description of the
encounter with Morchok in Dragon Soul. It is mostly targeted to healers
who desire to have a short but detailed overview of what is expected of
them during that fight.
This guide is intended to provide a comprehensive description of the
encounter with Morchok in Dragon Soul. It is mostly targeted to healers
who desire to have a short but detailed overview of what is expected of
them during that fight.
This guide applies to patch 4.3 of World of Warcraft.
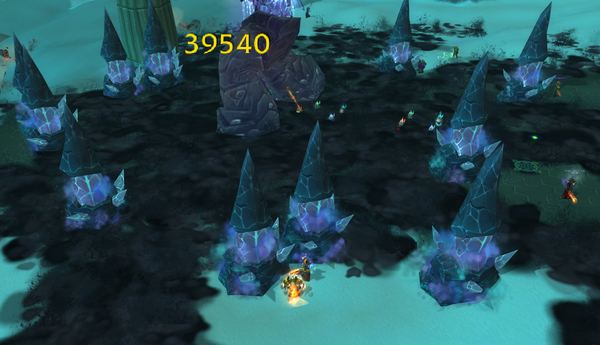
The Morchok encounter is a very straightforward and easy fight. Healers will
only have to move to melee range of a few crystals that the boss periodically
spawns, and sometimes take cover behind some pillars of stone, in order to
avoid taking damage.
From a healing perspective, the fight is not very challenging, although
there are certain times during the fight when players may take high amounts
of damage.
1. Overview of the Fight↑top
Morchok is a relatively simple encounter made up of two alternating
phases:
-
 The Crystal Phase, which lasts approximately 1 minute,
is a tank and spank phase during which the
raid is faced with two tasks (other than attacking the boss):
The Crystal Phase, which lasts approximately 1 minute,
is a tank and spank phase during which the
raid is faced with two tasks (other than attacking the boss):
- the tanks need to regularly taunt the boss off of each other;
- a few players need to soak the proximity damage done by crystals
that the boss summons.
-
 The Black Blood Phase, which lasts approximately 30 seconds,
requires your raid to hide behind pillars
of stone (created during the encounter) to avoid being hit by the Black
Blood flowing out from Morchok.
The Black Blood Phase, which lasts approximately 30 seconds,
requires your raid to hide behind pillars
of stone (created during the encounter) to avoid being hit by the Black
Blood flowing out from Morchok.
Finally, at 20% health, Morchok gains the  Furious buff. This does not
affect the alternation between the Crystal Phase and the Black Blood Phase: the
fight continues normally, just that the boss deals more damage and attacks
faster.
Furious buff. This does not
affect the alternation between the Crystal Phase and the Black Blood Phase: the
fight continues normally, just that the boss deals more damage and attacks
faster.
2. Crystal Phase↑top
2.1. Abilities
The following abilities are of interest to healers:
- Every 15 seconds (3 times per Crystal Phase), a number of players (DPS
and healers alike) will be linked to a red crystal. The crystal explodes after
12 seconds, dealing damage to these players, depending on how close to the
crystal they are.
- Every 10-15 seconds, Morchok will deal a moderate amount of damage to
all players within 25 yards of him, through
 Stomp (LFR/10-man/25-man).
- The tanks will taunt the boss amongst themselves, due to the
 Crush Armor debuff that the boss applies.
2.2. Strategy
From a tactical point of view, you have very few things to keep in mind
during the Crystal Phase:
- when
 you are linked to a
  Resonating Crystal (in addition to the
visible link, you will also have a debuff on you), move to melee range of
the crystal until it explodes (alternatively, another player can cover for you if
necessary, as the links target the closest players from the crystal);
Resonating Crystal (in addition to the
visible link, you will also have a debuff on you), move to melee range of
the crystal until it explodes (alternatively, another player can cover for you if
necessary, as the links target the closest players from the crystal);
- always stay within 25 yards of Morchok.
As a healer, you should expect the following sources of damage:
- sustained, moderate tank damage. The current tank will be progressively
debuffed with Crush Armor, so their damage taken will increase. The tanks
perform a swap regularly, so be prepared to heal the new tank.
- regular, unavoidable raid damage from Stomp (LFR/10-man/25-man);
- moderate amounts of damage on the specific players who are linked to
a Resonating Crystal (all these players receive a debuff that you should be
able to see on your raid frames; boss mods will likewise alert you).
2.3. Tips
Use cooldowns such as  Power Word: Barrier and
  Spirit Link Totem on
a group of players who is stacking on a Resonating Crystal, to reduce the
risk of them dying to the combination of damage from the Crystal and
Stomp (LFR/10-man/25-man).
Spirit Link Totem on
a group of players who is stacking on a Resonating Crystal, to reduce the
risk of them dying to the combination of damage from the Crystal and
Stomp (LFR/10-man/25-man).
3. Black Blood Phase↑top
 During this entire phase, Morchok is immobile. After 30 seconds, the boss returns to the Crystal Phase.
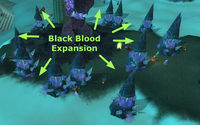 He will begin the phase by pulling the entire raid to him before channeling
 Black Blood of the Earth. This ability causes Black Blood to flow outwards
of him, dealing heavy damage to anyone standing in it.
Black Blood of the Earth. This ability causes Black Blood to flow outwards
of him, dealing heavy damage to anyone standing in it.
As soon as you are free to move (after being pulled by Morchok),
hide behind one of the stone pillars that appeared when the phase started.
As no one should be taking damage during this phase, you should take this
time to top off players with mana efficient heals, to use regenerate mana
through abilities like  Divine Plea and
  Hymn of Hope or to use a
Potion of Concentration.
Hymn of Hope or to use a
Potion of Concentration.
4. Heroic Mode↑top
As a healer, the heroic mode of Morchok is going to prove an extremely
stressful encounter, where a high amount of healing will be required, and
the incoming damage will often be unpredictable.
4.1. Differences from Normal Mode
The differences between normal and heroic Morchok are simple.
- At 90% health, Morchok splits himself in two, and your raid has to
fight both Morchoks at the same time (the other boss is called Kohcrom).
- Both bosses use the same abilities as Morchok does in normal mode, with the
same frequency and in the same way.
- Crush Armor no longer exists, meaning that there is no need for a
tank swap.
In addition to this, the bosses have more health, melee the tanks for more,
and all of their abilities deal more damage.
4.2. Strategy
Until the boss reaches 90% health, you should be within 25 yards of him,
to soak the damage from Stomp (LFR/10-man/25-man) and simply heal the tank and the
raid. At 90%, the actual heroic mode begins.
Your raid leader will split the raid into two balanced groups, one for each
of the two bosses (Morchok and Kohcrom). Once the boss reaches 90% health
and splits in two, simply go to the side where you were assigned. The bosses
will be tanked very far apart from one another, effectively meaning that the
two groups of your raid will play independently from one another. After the
split, Morchok will normally be on the right, and Kohcrom on the left.
4.2.1. Crystal Phase
The difficulty of the Heroic version of the fight lays in properly handling
the Crystal Phase (as the Black Blood Phase remains the same). Your strategy in
this phase will involve healing extremely high and sustained amounts of damage
on your entire group, while performing the following tasks.
- Always be within 25 yards of your boss, in order to soak the damage from
Stomp (LFR/10-man/25-man).
- If you are assigned to soak the Resonating Crystal (you almost
certainly will be), move on top of it each time it spawns and wait until it
explodes.
You should expect damage from the following sources:
- Moderate, sustained tank damage from the boss' melee attacks;
- High raid-wide damage from Stomp;
- High damage to the Resonating Crystal soakers.
There are two other things to look out for:
- One player in your group (specifically designated by the raid leader),
either a plate-wearing DPS or a Rogue, will take a double share of damage from
each Stomp. For this reason, you must pay special attention to this player's
health and top them off before each Stomp.
- In the event that you are assigned to soak the crystal, and the boss is
not within 25 yards of it, you should first wait for the boss to Stomp, and
only then move into melee range of the crystal to soak it (you should have 5-6
seconds to do this after the Stomp).
You should expect the damage to be extremely spiky when Stomps and
Crystals come in quick succession, and you should not hesitate to use
cooldowns to deal with such situations.
4.2.2. Black Blood Phase
The Black Blood Phase remains unchanged, and you should treat in the same
way as in normal mode.