Other Madness of Deathwing guides on Tauri Veins:  This guide is intended to provide a comprehensive description of theencounter with Madness of Deathwing in Dragon Soul. It is mostly targeted to healerswho desire to have a short but detailed overview of what is expected ofthem during that fight.
This guide applies to patch 4.3 of World of Warcraft.
The Madness of Deathwing encounter contains a large variety of adds,spells, and mechanics, but it is, ultimately, not difficult to understand orexecute. All three roles will, at certain times, have a lot ofpressure placed on them to perform well.
The five Aspects aid your raid during this encounter, although, as thefight progresses, they become effectively disabled, making it increasinglydifficult for your raid. Though, they do come back to help you killDeathwing, at the very end.
As a healer, you will be most challenged by the extreme amounts of raidand tank damage that you will have to heal. Other than this, there are veryfew other tasks to perform.
1. Overview of the Fight↑top
The Madness of Deathwing encounter is a two phase fight.
 During Phase One,you will have to defeat 4 of Deathwing's limbs (two wings and two arms).This part takes place on 4 different platforms, surrounded by water. Each ofDeathwing's limbs rests on one platform, and your raid will have to travelto every platform and kill all the limbs in order to make it to Phase Two.
During Phase Two, your raid will have to burn Deathwing's head, who will have crashednext to one of the platforms (where the entire phase is spent). At the sametime, your raid will have to regularly kill two types of adds. Deathwing'shealth will initially be at 20% and he will deal increasing raid damage as henears death.
1.1. Aspects and Their Buffs
 Throughout the fight, your raid will have assistance from the four dragonAspects. Each Aspect is flying over one of the four platforms, resulting inthe following naming conventions for the platforms in this guide:
- Leftmost platform: Alexstrasza's Platform;
- Middle-left platform: Nozdormu's Platform;
- Midle-right platform: Ysera's Platform;
- Rightmost platform: Kalecgos' Platform.
Each of the Aspects offers the raid a specific buff (such as increasedhealth) and uses a specific ability.
- In Phase One, once an Aspect'splatform has been cleared of Deathwing's limb, that Aspect will cease toassist the raid and focus solely on attacking Deathwing. This means thatPhase One becomes increasingly difficultas you progress, and your raid will have to choose the order in which toclear the platform carefully.
- In Phase Two, the Aspects are once again fighting alongside your raidand they resume their assistance.
The Aspects provide the following buffs and abilities:
- Ysera provides the raid with:
 Ysera's Presence: 20% increased healing done;
 Dream: an ability that Ysera grants to all raid members. Playersreceive an extra action button, with a 30 second cooldown. Using this abilitygrants the player 50% damage reduction for 5 seconds.
- Alexstrasza provides the raid with:
- Nozdormu provides the raid with:
 Nozdormu's Presence: 20% increased haste;
-
 Time Zone: an ability that places a type of protective bubble on theplatform where the raid is currently fighting. This causes theElementium Bolt (a type of projectile NPC that flies towards the raid) tobe greatly slowed down, giving your raid more time to kill it. It also reducesthe attack speed of any enemies within the zone by 50%.
- Kalecgos provides the raid with:
 Kalecgos' Presence: 20% increased damage dealt;
 Spellweaver: causes all attacks to deal 23,000 Arcanedamage to all enemies within 6 yards of the main target (but not to the maintarget itself).
2. Phase One↑top
Phase One consists of clearing all 4 platforms of Deathwing's limbs. Youwill do this one platform at a time, and a platform is considered cleared whenthe respective Arm or Wing Tentacle has been killed. For each platform, youwill have to defeat a series of adds in a specific order. Fortunately, thisis the same for all 4 platforms (with a minor variation), so the strategyremains simple.
Your raid leader will almost certainly clear the platforms in the followingorder: Ysera > Nozdormu > Alexstrasza > Kalecgos or Ysera > Alexstrasza >Nozdormu > Kalecgos. As such, we will provide you with the strategy only forthese sequences.
2.1. First Platform
The only non-healing tasks you must perform are:
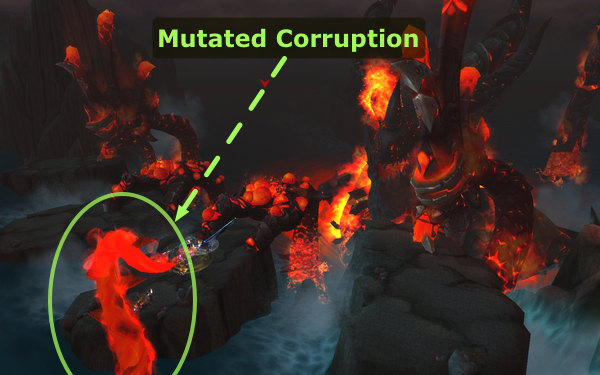
- While the Mutated Corruption is alive, spread out in such a way thatas few players as possible are in a line from the Corruption.
- When Deathwing casts Elementium Bolt, stand as far away as possiblefrom the impact location of the bolt (marked by a golden void zone).
From a healing perspective, you should be prepared for the following.
- The raid will take low, sustained and ever-increasing damage from
 Burning Blood.
 - While the Mutated Corruption is alive, the tanks will take extremeamounts of damage each time
 Impale is cast (you willhave to coordinate defensive cooldowns with them) and random raid members willtake moderate damage from
  Crush.
 - On this platform, the Elementium Bolt should deal no damage,but in the event that it does, it will deal a massive amount of raiddamage when it lands, and every second after that until it is killed.
- The tanks will take mild damage from tanking the Regenerative Bloods(they also apply a stacking debuff to the tanks, but it is of littleconcern).
- The raid will take a moderate amount of damage each timeBlistering Tentacles spawn (70% and 40% of the Wing or Arm Tentacle'shealth).
Once the Wing or Arm Tentacle is dead, you should move over to the nextplatform.
2.2. Second Platform
By now, you will have lost Ysera's 20% increased healing buff and the Dream ability, but the strategy for this platform remains identicalto the previous one.
2.3. Third Platform
By now, you will have lost either Alexstrasza's buffs or Nozdormu'sbuffs.
In case you have lost Alexstrasza's buffs, your raid will take muchmore damage from the Blistering Tentacles (70% and 40% of the Wingor Arm Tentacle's health), and you should be prepared to use defensivecooldowns.
In case you have lost Nozdormu's buffs, your raid will take anextreme amount of damage from the Elementium Bolt, both when it landsand every second after that until it is killed. This time will strain yourhealing greatly, and you will have to stack healing cooldowns in order to keepyour raid alive.
Otherwise, except for the extra healing requirement, the strategy does notchange.
2.4. Fourth Platform
By now you will have lost the other of Alexstrasza or Nozdormu's buffs,and healing will be at its most difficult, although nothing else changesfrom a strategy point of view.
3. Phase Two↑top
During this phase, you will have to stack with your raid and heal the damageoriginating from the following sources:
- Constant, increasing raid damage from Deathwing's Corrupted Blood. The damage from this ability increases three timesduring this phase: when Deathwing's health reaches 15%, 10% and 5%.
- Random raid damage from players who are targeted by
 Shrapnel.In case you are targeted by Shrapnel, you must use your Dream abilityright before the debuff that this ability leaves on you runs out, or you will die.
 - Moderate, although spiky tank damage from the Elementium Terrors,two big adds that will spawn a few times during the phase.
The very end of the phase is extremely strenuous from a healing point ofview, and you should use any available healing cooldowns at this time.
4. Heroic Mode↑top
The Heroic mode of Madness of Deathwing is a strenuous test of yourhealing. The encounter is not very different from Normal mode (there is onlyone strategy change that matters to you, as a healer), but it contains severalmoments when healing is extremely difficult. Additionally, the encounter isvery long, requiring your focus for a full 15 minutes.
4.1. Differences from Normal Mode
All the enemies in the encounter have their health increased, compared toNormal mode. Moreover, a large number of abilities deal increased damage. Themost problematic of these increases is the damage increase of Impale. The exact changes are:
 Elementium Blast now deals 468,000 damage on impact and another468,000 damage every 5.2 seconds, up from 390,000 damage (both on impact andafterwards) in Normal mode.
 Degenerative Bite (10-man/25-man) now deals 1,800 damage per second, per stack in10-man difficulty and 2,400 damage per second, per stack in 25-mandifficulty, up from 1,500 and 2,000 damage respectively.
 Blistering Heat now deals 3,750 damage every 2 seconds, up from2,500 in Normal mode.
- Crush now deals 130,000 damage, up from100,000 damage in Normal mode.
- Impale (10-man/25-man) now deals 840,000 damage in 10-man difficultyand 1,200,000 damage in 25-man difficulty, up from 400,000 in bothdifficulties.
- Shrapnel now deals 400,000 damage, up from 200,000 damage inNormal mode.
 Tetanus (10-man/25-man) now deals 72,000 damage on application and then another24,000 damage per second, per stack in 10-man difficulty and 96,000 damageon application and 36,000 damage per second, per stack in 25-man difficulty,up from 60,000/20,000 and 80,000/30,000 respectively.
In addition to these changes, a new mechanic exists:
 Corrupting Parasite is a rather complex mechanic that will occurtwice on every platform during Phase One, once at around the same time thatthe Mutated Corruption spawns and once again 60 seconds later.It begins with Corrupting Parasite, a 10-second debuff cast byDeathwing on a random raid member. This debuff deals increasing Shadowdamage, for a total of roughly 300,000 over the course of its duration. Whenthe debuff wears off, an NPC with the same name will spawn at the location ofthe afflicted raid member.
- Corrupting Parasite is the enemy NPC that spawns when Corrupting Parasitewears off. The Corrupting Parasite has 3M health in 10-man difficulty and 9Min 25-man difficulty. It has no aggro table, it does not melee, it can bekilled, and Alexstrasza's
 Cauterize (Phase One) will damage itfor a small amount of its life. When it spawns, it deals 250,000 Fire damage to all raid memberswithin 10 yards of its location (excluding the raid member who was affectedby the debuff). After this, the Corrupting Parasite will begin channeling
 Unstable Corruption.
 - Unstable Corruption is a 10 second cast, at the end of which theCorrupting Parasite will deal 10% of its remaining health as damage to theentire raid. If the Parasite is inside the Time-Zone provided by Nozdormu, itscast time is increased by 50%. After casting Unstable Corruption, theCorrupting Parasite will despawn.
4.2. Strategy
The strategy for the encounter remains mostly the same (order of platforms,your raid's actions), with the following differences.
4.2.1. Corrupting Parasite
Whenever the Corrupting Parasite DoT is applied to a raid member,that player will require intensive healing. After 10 seconds, the raid memberwill position himself inside the Time Zone from Nozdormu, and everyoneelse must get 10 yards clear of this player. If you yourself are targetedby the debuff, make sure you move into the Time Zone.
Afterwards, your DPS players will severely damage or kill the resultingNPC, the Corrupting Parasite. If the Corrupting Parasite is notkilled by the end of its 10 second cast, you should expect a varying amountof raid damage.
On Kalecgos' platform, there is no Time Zone, and for this andother reasons, the Corrupting Parasite should be placed next to theMutated Corruption.
4.2.2. Moments of High Damage
In addition to the sources of damage that you were already faced with inNormal mode, the following points will require special attention from you inHeroic mode:
- the extreme amounts of damage that the tanks will be taking from Impale (10-man/25-man);
- the raid damage when Elementium Bolt lands on Kalecgos' platform;
- the raid damage from Blistering Tentacles on Nozdormu and Kalecgos'platforms;
- the tank damage from Elementium Terrors during Phase Two;
- the raid damage in Phase Two, especially towards the end.
Finally, you should expect very intense amounts of damage onthe tanks in both phases (from the Mutated Corruptions in Phase One andfrom the Elementium Terrors in Phase Two).