Utolsó módosítás programmer, ekkor: 2014.06.23.
In this article, we present you with various talent trees for Blood
Death Knights (WoW 4.3) that you can use in specific situations. We also explain in
detail what the talents do, how they work together, and how you can
customise your talent tree in order to adapt it to a particular boss.
The other articles of our Blood Death Knight guide can be accessed
from the table of contents on the left.
1. Common Talent Builds↑top
The following build is the default choice for Blood Death Knights, with an
accent on single target damage.
- Prime Glyphs
- Major Glyphs
- Minor Glyphs
This build is a variation of the previous build, which provides a
10% attack power increase to your entire raid (through  Abomination's Might).
You should only take this build if no one else in your raid can provide the
buff.
Abomination's Might).
You should only take this build if no one else in your raid can provide the
buff.
- Prime Glyphs
- Major Glyphs
- Minor Glyphs
This build is optimised for AoE situations.
- Prime Glyphs
- Major Glyphs
- Minor Glyphs
2. Customising Your Build↑top
First, we will present and explain the fixed talents that a Blood Death Knight should
always take. Then, we detail the optional talents with which you can customise
your talent build. Finally, we list the various mandatory and optional glyphs.
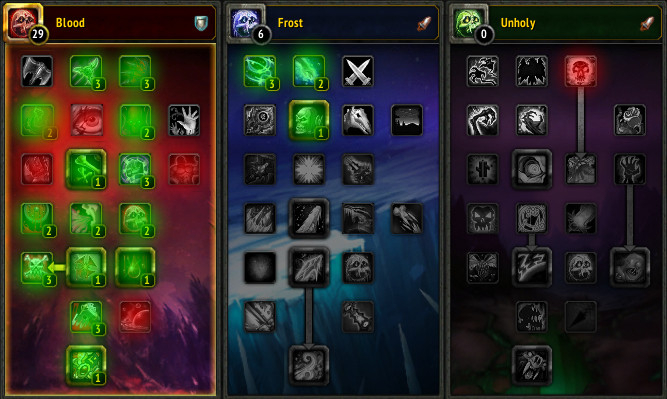
2.1. Talents
Blood Death Knights have a rather strict talent point distribution. There
are very few optional talents which can be invested in.
In the following image, the fixed talents have been hightlighted in green,
while the optional talents have been hightlighted in red:
2.1.1. Fixed Talents
A great many of the fixed talents are extremely straightforward, but we
shall list them all for completeness' sake:
- 3/3
 Blade Barrier: reduces damage taken by 6%.
- 3/3
 Bladed Armor: this is a threat/DPS talent, which increases your
attack power. There are no other survival alternatives.
Bladed Armor: this is a threat/DPS talent, which increases your
attack power. There are no other survival alternatives.
- 2/2
 Improved Blood Tap: reduces the cooldown of Blood Tap by
30 seconds.
Improved Blood Tap: reduces the cooldown of Blood Tap by
30 seconds.
- 2/2
 Scarlet Fever: reduces the physical damage done by targets
affected by
Scarlet Fever: reduces the physical damage done by targets
affected by  Blood Plague. This effect does not stack with other tanks'
similar effects such as
Blood Plague. This effect does not stack with other tanks'
similar effects such as  Demoralizing Shout or
  Demoralizing Roar. This
talent is listed as mandatory because you cannot reliably guarantee that other
tanks will be able to maintain their equivalent debuff on the boss or adds
the whole time.
Demoralizing Roar. This
talent is listed as mandatory because you cannot reliably guarantee that other
tanks will be able to maintain their equivalent debuff on the boss or adds
the whole time.
- 1/1
 Bone Shield: this is a self-buff with a 1 minute cooldown.
It grants you a buff with 6 charges. Each time you receive a damaging attack,
a charge is consumed. While at least 1 charge remains active, all damage
taken is reduced by 20%, and all your damage dealt is increased by a very
small amount (2%).
Bone Shield: this is a self-buff with a 1 minute cooldown.
It grants you a buff with 6 charges. Each time you receive a damaging attack,
a charge is consumed. While at least 1 charge remains active, all damage
taken is reduced by 20%, and all your damage dealt is increased by a very
small amount (2%).
- 3/3
 Toughness: increases the amount of armor you gain from items
by 10%. This is a simple survival talent.
Toughness: increases the amount of armor you gain from items
by 10%. This is a simple survival talent.
- 2/2
 Sanguine Fortitude: increases the damage reduction from
 Icebound Fortitude by 30% and also makes Icebound Fortitude cost no
runic power to use. This is especially useful as it allows you to use it
exactly when needed without having to consider your resources.
Icebound Fortitude by 30% and also makes Icebound Fortitude cost no
runic power to use. This is especially useful as it allows you to use it
exactly when needed without having to consider your resources.
- 2/2
 Blood Parasite: gives your melee attacks a 10% chance to spawn a
Bloodworm. Bloodworms attack your enemies and, after a varying amount of time
(not longer than 20 seconds, though), explode. When they explode, the worms
heal you and other raid members for a small amount.
Blood Parasite: gives your melee attacks a 10% chance to spawn a
Bloodworm. Bloodworms attack your enemies and, after a varying amount of time
(not longer than 20 seconds, though), explode. When they explode, the worms
heal you and other raid members for a small amount.
- 2/2
 Improved Blood Presence: increases your rune regeneration rate
by 20% and grants you immunity against critical strikes, while in
Blood Presence. This effectively allows you to tank.
Improved Blood Presence: increases your rune regeneration rate
by 20% and grants you immunity against critical strikes, while in
Blood Presence. This effectively allows you to tank.
- 1/1
 Rune Tap: provides you with the Rune Tap ability,
which converts a Blood rune into 10% of your maximum health.
Rune Tap: provides you with the Rune Tap ability,
which converts a Blood rune into 10% of your maximum health.
- 3/3
 Will of the Necropolis: each time (not more often than each 45
seconds, though) that your health drops below 30%, the cooldown of
Rune Tap is reset and the next Rune Tap is free to cast. Additionally,
when this effect occurs, all damage taken is reduced by 25% for 8 seconds.
Will of the Necropolis: each time (not more often than each 45
seconds, though) that your health drops below 30%, the cooldown of
Rune Tap is reset and the next Rune Tap is free to cast. Additionally,
when this effect occurs, all damage taken is reduced by 25% for 8 seconds.
- 1/1
 Vampiric Blood: provides you with the Vampiric Blood
ability. This increases your maximum health by 15% for 10 seconds, and also
increases all healing you receive by 25% for the same amount of time.
Vampiric Blood: provides you with the Vampiric Blood
ability. This increases your maximum health by 15% for 10 seconds, and also
increases all healing you receive by 25% for the same amount of time.
- 3/3
 Improved Death Strike: this talent greatly boosts your
Death Strike. It increases its damage and critical strike chance, as well
as the amount of healing that it does to you.
Improved Death Strike: this talent greatly boosts your
Death Strike. It increases its damage and critical strike chance, as well
as the amount of healing that it does to you.
- 1/1
 Dancing Rune Weapon: grants you the Dancing Rune Weapon
ability, which increases your chance to parry by 20% for 12 seconds, in
addition to dealing some damage to the boss.
Dancing Rune Weapon: grants you the Dancing Rune Weapon
ability, which increases your chance to parry by 20% for 12 seconds, in
addition to dealing some damage to the boss.
- 3/3
 Runic Power Mastery: increases the maximum capacity of your
runic power by 30. This is a threat/DPS and a filler talent.
Runic Power Mastery: increases the maximum capacity of your
runic power by 30. This is a threat/DPS and a filler talent.
- 2/2
 Icy Reach: increases the range of your
  Icy Touch and
 Chains of Ice abilities by 10 yards. It has some usefulness in certain
encounters, but it is mostly a filler talent.
Chains of Ice abilities by 10 yards. It has some usefulness in certain
encounters, but it is mostly a filler talent.
- 1/1
 Lichborne: grants you the Lichborne ability. This is
a self-buff with a 2 minute cooldown and 10 second duration. While this effect
is active, you can heal yourself by casting
Lichborne: grants you the Lichborne ability. This is
a self-buff with a 2 minute cooldown and 10 second duration. While this effect
is active, you can heal yourself by casting  Death Coil on yourself.
- 2/3
 Epidemic: increases the duration of your diseases by 8 seconds,
meaning that you need to worry about refreshing them less often.
Epidemic: increases the duration of your diseases by 8 seconds,
meaning that you need to worry about refreshing them less often.
2.1.2. Optional Talents
The only meaningful choice you will have to make, within the Blood
specialisation, depends on whether you wish to pick up  Crimson Scourge,
for improved AoE tanking.
Crimson Scourge,
for improved AoE tanking.
Additionally, you may choose not to take Abomination's Might, if the
buff is provided by someone else in your raid (Paladins, Enhancement Shamans or
Marksmanship Hunters). This situation is extremely unlikely to occur outside
of 10-man raids, and even there it is exceptional.
Below, we list all the optional talents and the reasons for possibly choosing some
of them.
- 1/3
 Scent of Blood: gives you a small chance to generate extra
runic power. This is a threat/DPS talent, for which there are no
survival alternatives. You should choose this if you do not need to pick up
either Abomination's Might or Crimson Scourge. We advise taking
points in this talent over the less desirable Blood Caked Blade and Epidemic
talents.
Scent of Blood: gives you a small chance to generate extra
runic power. This is a threat/DPS talent, for which there are no
survival alternatives. You should choose this if you do not need to pick up
either Abomination's Might or Crimson Scourge. We advise taking
points in this talent over the less desirable Blood Caked Blade and Epidemic
talents.
- 1/3, 2/3 or 3/3
 Blood-Caked Blade: this is another threat/DPS talent,
for which there are no survival alternatives. It gives your auto attacks a
chance to cause another, relatively weak attack. You should take points in
this talent if you do not need to take any points in Abomination's Might
and Crimson Scourge, although Scent of Blood is a better alternative.
Blood-Caked Blade: this is another threat/DPS talent,
for which there are no survival alternatives. It gives your auto attacks a
chance to cause another, relatively weak attack. You should take points in
this talent if you do not need to take any points in Abomination's Might
and Crimson Scourge, although Scent of Blood is a better alternative.
- 2/2 Abomination's Might: you should only take this talent if no one
in your raid can provide the 10% increased attack power. Otherwise, this talent
is not useful.
- 2/2 Crimson Scourge: increases the damage dealt by Blood Boil
(your AoE ability) and gives you a chance to gain cost-free Blood Boils. This
is an AoE enhancing talent and should not be taken if you do not need to
improve this aspect of your tanking.
- 3/3 Epidemic: increases the duration of your diseases by 12 seconds
(up from the 8 seconds granted by 2/3). This talent point simplifies your
tanking somewhat.
2.2. Glyphs
2.2.1. Prime Glyphs
It is possible to use Glyph of Death Strike instead of Glyph of Death
Coil if, for some reason, you have not talented Lichborne. Note that the
Glyph of Death Strike is simply a threat/DPS glyph, and it is surpassed by
the glyphs of Rune Strike and Heart Strike.
Glyph of Death and Decay provides more AoE threat generation.
2.2.2. Major Glyphs
Glyph of Dancing Rune Weapon (increased threat generation) is a mandatory
Major Glyph. For the remaining two slots, you should choose, from the
following glyphs, based on the circumstances of the encounter:
- Glyph of Rune Tap: heals your party for 5% of their maximum health
each time you use Rune Tap;
- Glyph of Vampiric Blood: your Vampiric Blood no longer provides you
with 15% health when used, but instead increases your healing received by a
total of 40% (up from 25% unglyphed). This healing increase affects both
self-heals and heals from other healers, and it is generally advised to
use this glyph, as the total gain is much higher than 15% of your health. If
you feel that you do need 15% extra health to simply survive a very large
attack, however, do not to use this glyph.
- Glyph of Anti-Magic Shell: increases the duration of your
 Anti-Magic Shell by 2 seconds, making it easier for you to time using this
ability for magic damaging attacks.
Anti-Magic Shell by 2 seconds, making it easier for you to time using this
ability for magic damaging attacks.
Glyph of Pestilence and Glyph of Blood Boil can make AoE tanking
easier.
2.2.3. Minor Glyphs
Minor Glyphs generally provide you with small benefits that make your
life easier, but do not increase the strength of your character or your raid.
The best glyphs to use are: